RDI Celebrates 2026 CRN MSP 500 Recognition for 6th Year!
Windows Device Lockout Awareness: Microsoft & BitLocker Locking Users Out of Their Laptops/PCs
Post Date:
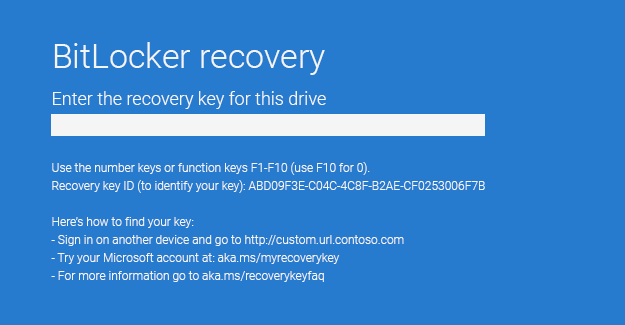
Have you or someone you know turned on your laptop/PC and found yourself locked out with BitLocker on your screen? You are not alone. Many others have found themselves suddenly locked out of their PC in need of a recovery key for BitLocker (which they had no idea was installed) and no idea how to get the needed recovery key.
Why is this happening, and what should you do?
Why Are You Locked Out?
You can be locked out because you performed a hardware-level change with your computer (such as BIOS configurations, enabled/disabled secure boot, boot order, UEFI to legacy, TPM enabled/disabled, or added/removed new hard disk/SSD). If this is the case, you should be able to revert the change and then be allowed access again, whereupon you can disable BitLocker or retrieve the recovery key before reperforming your hardware-level change.
Others have found themselves locked out after a Microsoft update and were immediately locked out after the update’s automatic restart.
Ultimately, your PC/laptop has the HDD/SDD encrypted (BitLocker enabled), and a change to the hardware components or the BIOS settings has caused this security function to act and lock the PC/laptop upon powering on.
How Did BitLocker Get Enabled?
BitLocker is a security feature that is intended to prevent bad actors from taking a stolen/lost device and accessing the data on it. To see if it is enabled on your PC/laptop, open your Control Panel from the start menu. Then select “BitLocker Drive Encryption.” If you see the word “On” (such as “C: On” or (Windows BitLocker On”), then BitLocker is enabled.
If you are sitting there thinking, “But I never set up BitLocker,” you may be correct. In some cases, without telling you, Microsoft automatically enabled BitLocker on your PC/laptop after you did your OOBE (out-of-box experience). In other cases, you may have unknowingly enabled it when setting up your PC/laptop because it was called something different, such as “enable device encryption.”
How to Get The Recovery Key
Don’t wait until you are locked out to get your BitLocker recovery key! It is best to get your recovery key and save it somewhere secure that you can access in the event that you are locked out.
BitLocker is tied to your Microsoft account, so you’ll need to log in to your Microsoft account (if you are locked out of your device, you’ll need to use another device). Once logged in, follow these steps:
- In the top navigation menu, click on “Devices.”
- On the Devices page, select the device you are locked out of and then “See Details.”
- If you do not see your device, you will need to follow the on-screen directions to register/re-register your device. You will need the device’s serial number. This can be found by pressing “Windows” + “R” at the same time on your keyboard, typing “cmd” into the run dialog, and hit “Enter.” Now at the blinking cursor, type “wmic bios get serial number” and hit “Enter” on the keyboard. The serial number should appear underneath your prompt. Note: if you are locked out of your device, running a command prompt may not be possible. Other ways to find the serial number may be on the device’s original box, the purchase receipt, a manufacturer account for the device, or a sticker on the device.
- Look for “Bitlocker data protection” and click on “Manage recovery keys” below it.
- Save the recovery information here somewhere secure, such as a password manager. If you’re locked out, proceed to enter the recovery key shown into your locked device.
If you can’t find a recovery key or need to re-register your device and are unable to do so, check to see if your Microsoft account backed up the BitLocker recovery information by going to: https://account.microsoft.com/devices/recoverykey.
If you cannot find the recovery information that you need, or the recovery information doesn’t work, you may have to factory reset your device (this will permanently delete any files stored on your device). Depending on your device, you may try changing your bios options/settings if you can access them.

Recommended Safety Steps
Whether it’s your home or business technology, it is a vital tool you rely on for communicating, file storage, and more. To best protect your technology and files/data, we highly recommend that you:
- Use a password manager such as LastPass, 1Password, Bitwarden, etc., that you can access from any device. Ideally, you’ll want to choose a password manager that saves secure notes in addition to passwords. Use your password manager to save your BitLocker information (device name, key id, recovery key, drive, and key upload date) as well as the Microsoft account username/password it’s associated with. It won’t hurt to include your device’s serial number and other identifiers if you need them.
- Regularly back up your devices to a secure location. Should you ever need to reset your PC/laptop, you can reduce the risk of losing important files/data if you have a recent backup that you can use for recovery.
- Follow the best cybersecurity practices to keep you and your devices safe.
How to Disable BitLocker
BitLocker is designed to protect your data from bad actors, so if you store sensitive data on your device that you don’t want anyone else to access, it is recommended to keep BitLocker enabled. If you don’t wish to protect your device and data with BitLocker, and you have permission (i.e., you are the system administrator for the device), then you can disable BitLocker through the Windows Control Panel/GUI.
- Open your Control Panel from the start menu
- Select “BitLocker Drive Encryption”
- Select “Turn off BitLocker”
- Enter your administration credentials to continue if prompted
- A message stating that the drive will be decrypted and it may take some time will appear. Click “Turn off Bitlocker/Decrypt the drive”
- Once the decryption is complete, restart the PC/laptop